
Jul
UPDATE 1 (July 15): Firmware Bug Notice: Currently on Digital Back Firmware 3.00.20, the digital back’s file format will automatically switch to 14 bit Smart everytime when the digital back is turned off and then turned back on; EVEN IF THE DISPLAYED FILE FORMAT ON THE DIGITAL BACK SAYS OTHERWISE. We are continuously working with Phase One on this issue to see when it can be resolved. In the meantime, there are two ways of workaround:
-
- If Frame Averaging/Capture One Inside Style/SD main storage is a necessary part of you workflow, please make sure that every time the digital back is turned off and then back on, remember to change the file format to S14IIQ (IIQ14 Smart) and then back to the file format you are intended to use (you should need the storage counter decrease after you change the file format to a large bit depth)
- If the functions mentioned above are not needed as a part of your workflow or the step 1 workaround is not practical; please downgrade the System Firmware to 4.02.7.FWP (can be downloaded with link below) for the time being until Phase One has a more permanent solution.
UPDATE 2 (July 25): Phase One has posted an updated firmware that fixes the firmware bug noted in Update 1. DT is currently testing that update.
In this IQ4 Creative Control Release, Phase One has included three major feature updates for the IQ4 Camera Systems. You are able to download the firmware updates here (as of the time of this article, the . Before updating please make sure you read the following important steps:
IQ4 Creative Control Firmware Installation Steps. Please read all the steps before proceeding:
- Make sure that Feature Update #4 SR2 firmware (4.02.7.fwp) is installed on your system as this is a requirement to install the latest firmware. It can be downloaded HERE (Feature Update #4 SR2 for IQ4 and XF)
- Download the latest FWP file from HERE (Creative Control Package for IQ4 and XF) to the root directory of an XQD card (do not put the firmware file in any folders)
- Make sure you have fully charged batteries inserted in the digital back and/or XF camera body with attached viewfinder
- Insert the XQD card into the IQ4 digital back
- On the IQ4, go to Menu > System Settings > Firmware > Update Firmware
- Do not interrupt the updating process, the updating process can take up to 20 minutes. The digital back and the camera will display that the firmware has been updated when the update process is complete
Below are the general overview from Phase One on how to access and use each of the three functions:
Automated Frame Averaging
The Automatic Frame Averaging feature allows the merging of multiple raw sensor readouts into a single IIQ RAW files while averaging the exposures automatically. Think of this feature as a way to simulate longer exposures by combining a series of shorter captures. The benefits are two-fold; you can achieve long exposure without having to use a Neutral Density filter, which might add a color cast. The nature of the feature also means that any random captured noise will be cancelled out resulting in superior image quality with lower noise.
Automatic Frame Averaging relies on the Electronic Shutter (ES), which will be enabled automatically when you activate the feature on the XF IQ4 system. If you are using the IQ4 in tech camera mode, remember to enable Electronic Shutter.
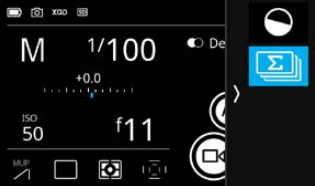
The mirror on the XF Camera Body will also open automatically and be locked in the upright position, so if you need to use autofocus on the XF Camera, remember to do this before enabling Automatic Frame Averaging. Otherwise use Live View to focus manually. This function can be accessed by swipe from the right on the Camera Control menu.
Using Automatic Frame Averaging
The feature is simple to use as the IQ4 will do all the complicated calculations and image merging automatically for you.
First adjust the Shutter Speed, Aperture, and ISO value from the Camera Controls to ensure that you get a properly exposed image without any blown out highlights. It is recommended to take a test shot first and check the exposure before entering the Automatic Frame Averaging tool. If you have a specific area with highlights you need to preserve, you can also use Live View with Exposure Simulation, zoom in to that area and use Live RAW Clip Warning to ensure that no pixels are being blown-out.
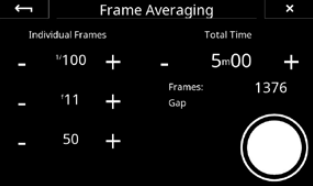
Once the proper exposure has been established, enable Automatic Frame Averaging from Camera Controls by sliding your finger in from the right and tap on the icon. Then you just need to set how long you want the entire exposure sequence to be by moving the Total Time slider.
The feature works by continuously reading out the sensor during the entire sequence, so if you have chosen a Shutter Speed that is longer than the sensor readout time, the Automatic Frame Averaging tool will notify you that will be a Gap between each captured frame. This is only worth to be aware of if you want to capture movement like waves perfectly smooth, otherwise the feature will still work fine. If the Shutter Speed is so long that there will be no gaps between each captured frame, you will be notified that the recording is in Continuous mode.
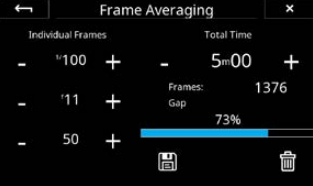
Finally, start the capture sequence by tapping on the Capture button. The XF IQ4 Camera System will now take a series of captures and average the exposures continuously in the background. A Progress bar will inform you how far the feature is from being completed. If you want to abort the entire capture, tap on the trash icon. If you instead want to stop the Automatic Frame Averaging sequence and save it as an image at that point in time, tap on the save icon.
When the desired total exposure time is reached, the final RAW file is saved on the memory card, ready to use in Capture One.
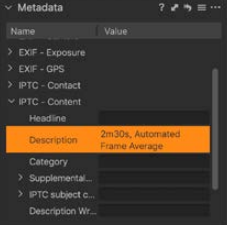
The IQ4 will append a note in the IPTC – Description metadata field to each RAW file so that you can find and differentiate the Automatic Frame Averaging files in Capture One Pro. It will note the Total Time and label the RAW file as an Automated Frame Average.
It is important to ensure that no highlights are burned-out when you establish the proper exposure. Specular highlights in for example waterfalls can introduce purple fringing which will be amplified by the additive nature of the feature. In these circumstances it is recommended to underexposure the image and then lift the shadows in Capture One after the fact. This workflow will work out very nicely because the Automatic Frame Averaging files are extremely clean and noise free.
For more on this feature, read our in-depth article here.
Custom IQ Styles
Capture One Inside now enables photographers to load their own custom styles into the IQ4, so that the captured images can reflect you own unique vision and style. The Custom IQ Style can easily be created in Capture One Pro and saved to the memory card, imported into the IQ4 and used as a unique look on the next captures. In addition, Capture One Inside now supports the Clarity and HDR image adjustments. To apply the styles, it is can be accessed Main Menu > File Settings > IQ Style. To upload custom IQ Styles, it can be accessed through Main Menu > IQ Settings > Import Custom Style
Creating Custom IQ Style
Start Capture One Pro and create the image adjustments that you want to include in your style. We recommend that you make the adjustments on a RAW file captured on the IQ4 with the kind of scene and lighting that you are going to use the style with, e.g. a landscape, weddings or fashion shot. These image adjustments from Capture One Pro are supported on the IQ4 and can be included in your Style:
- Contrast (Exposure tool)
- Brightness (Exposure tool)
- Saturation (Exposure tool)
- HDR – Highlights
- HDR – Shadows
- Clarity (Natural/Punch/Neutral)
- Curves
- Color Balance
- Color Editor (Advanced)
- Levels
- Black & White (enable/disable)
Note that some image adjustments in Capture One like Film Grain and Vignetting will not show up on IQ4 as there are currently not supported, but you can still include them in the Style. All the included adjustments will be retained in the style metadata so even if IQ4 will not show them all on screen, they will be applied to the captures once you open them in Capture One Pro.
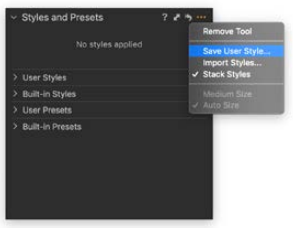
Once you are satisfied with the look, go to the Styles and Presets tool in Capture One Pro, click on the Action menu in the top-right corner and choose Save User Style…
A Save Style dialog box is now shown. Select the image adjustments that you want to include in your Style and click on Save.
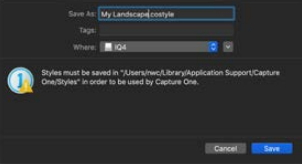
Give the Style a fitting name and select where to save it. You can save it directly to the memory card to save time. Otherwise copy the .costyle to the memory card. If you want to use one of the Capture One Styles that you have previously saved, you can locate those on Windows under %localappdata% > Capture One > Styles and on Mac under Library > Application Support > Capture One > Styles.
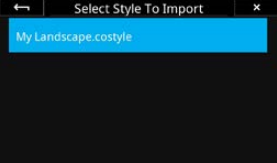
Once the Style have been saved to the XQD card, insert the XQD card in the IQ4. Then open the IQ4 Menu and select IQ Settings > Import Custom Style and choose your style.
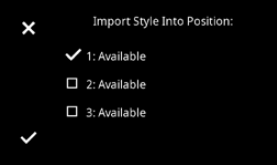
You can then choose which of the 3 custom style slots you want to load your Style into by tapping on the desired option. If it is empty, it will be labelled Available. Once ready, tap on the check mark in the bottom-left corner to accept. Your Style is now saved on the IQ4.
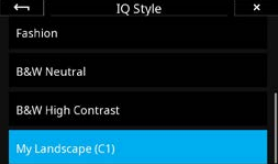
Once your Style is loaded into one of the 3 Custom Style slots on IQ4, you can select it from Style menu as any other Style by tapping on the style icon on Camera Controls or by going to the menu and choosing File Settings > Style > Custom Style 1-3.
To get started with great Capture One styles, check out our DT Style Packs!
Workflow and Storage Flexibility
The Direct Image Transfer feature will automatically copy the RAW files on the XQD and SD cards from the IQ4 to the
connected computer via Capture One. This is can be very convenient as you don’t need a card reader to transfer the files.
Storage on the SD card can now be combined with the XQD card in four different ways to ensure that you can always
choose the optimal workflow. There are two new SD card features. Primary Storage ensures that you can capture the RAW
files directly to the SD card without the use of a XQD card, while the SD Overflow feature combines the XQD and the SD
memory cards as one, single storage unit for RAW files, where the images will automatically and seamlessly be saved on
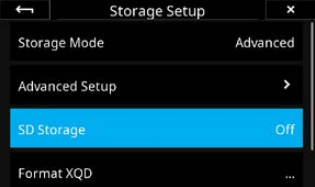
the SD card once the XQD card is full. The new features are accessed from the Storage Setup menu.
SD card Storage options
Storage on the SD memory card can be combined with the XQD card in a number of ways to ensure that you can always choose the optimal workflow. You can either save a RAW file version or a JPEG version of the captured images on the SD card. It is also possible to mirror the same RAW image to both the SD and XQD cards as a backup solution. Finally, you can combine the SD and XQD cards as one, single storage unit, where the images will automatically be saved on the SD card once the XQD card is full.
You can change the SD card storage options by going to the IQ4 Menu, accessed by swiping up from the bottom edge of the IQ4 touch screen, and selecting Storage Setup > SD Storage.
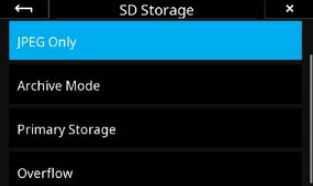
JPEG versions are reduced in resolution and can thus greatly speed up the workflow when needing to review the shots fast on location with clients or handing JPEG copies of to clients or an art director by giving them the JPEG versions on a SD card. You enable the option to save a jpeg file version on the IQ4 by selecting IQ4 Menu > Storage Setup > SD Storage > JPEG Only. Note that the IQ4 will need to save a RAW file to the XQD card to create the JPEG version from; it is not possible to only save a JPEG version of the captured image.
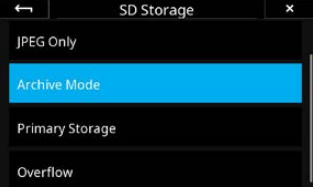
Saving a RAW backup on the SD card If you want to save a RAW file to the SD card as a backup measure in addition to the RAW file saved on the XQD card, select the Archive Mode option in the SD Storage menu.
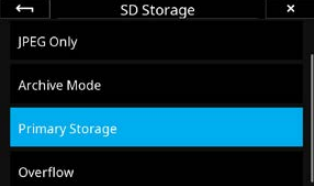
The Primary Storage feature ensures that you can capture the RAW files directly to the SD card instead of on the XQD card if you don’t have an XQD card available or it is full.
It is recommended to use SD card that has a write speed of at least 100 MB/s and is marked with speed class U3.
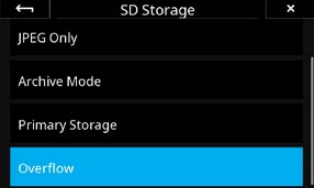
The Overflow storage feature will enable you to concentrate fully on the shot at hand without having to worry about whether you might run out of space on the XQD card. This is facilitated by combining the XQD and the SD memory cards as one, single storage unit for RAW files, where the images will automatically and seamlessly be saved on the SD card once the XQD card is full.
Note that if the SD storage card has been set to Off, you will not be able to browse and view the images captured to the SD card.
Direct Image Transfer
The Direct Image Transfer feature will automatically copy the RAW files on the XQD and SD cards from the IQ4 to the connected computer via Capture One. This is can be very convenient as you don’t have to use a card reader to transfer the files and can thus save time.
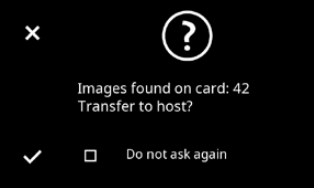
To initiate the Direct Image Transfer, first start Capture One Pro on your computer and then connect it to the IQ4 via the USB-C or Ethernet cable. The IQ4 will now ask whether you want to copy all the image files on the XQD and SD cards to the currently active Capture folder in Capture One Pro. Tap on the checkmark to start the file transfer. A progress bar will be shown on the screen. You can disable the Direct Image Transfer pop-up dialog by enabling the Do not ask again option on the screen.
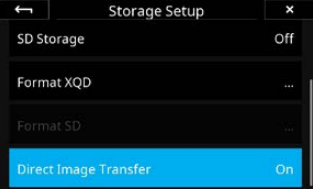
The Direct Image Transfer feature can be turned on or off by going to the IQ4 Menu > Storage Setup > Direct Image Transfer. If the images files are already present in the Capture folder in the computer, Capture One Pro will automatically rename the copied files by adding a “1” to the end of the file name so you don’t have to worry about getting any files overwritten.
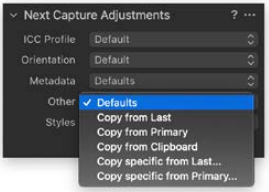
Note that the Direct Image Transfer feature basically works like any tethered capture. This means that the Next Capture Adjustments tool in Capture One controls whether the next transferred image will inherit the adjustments and Styles from the previous image. This will happen if the Other drop-down menu is set to Copy from Last.
If you want to ensure that each image retains their own applied Style only, please set the Other drop-down menu to Defaults instead of Copy from Last.
Be aware that if SD Storage is set to Off, the files on the SD card will not be transferred. Likewise, if the SD Storage is set to Primary Storage, the files on the XQD card will not be transferred.
Note that the IQ4 doesn’t keep a record on what files it has transferred to the computer when it is turned off. It will therefore initiatie a new full file transfer when you turn it on again.
Please feel free to contact DT Support if you are looking for guidance on installing the firmware of the functionality of the new features, we are looking forward to hear from you!